プロジェクト作成
開発環境としてEclipseを使用し、Webアプリ用プロジェクトを作成する。
1. Eclipseプロジェクトを作成する
- メニュー[ファイル]->[新規 Springスターター・プロジェクト] * 以下のように入力し「次へ」
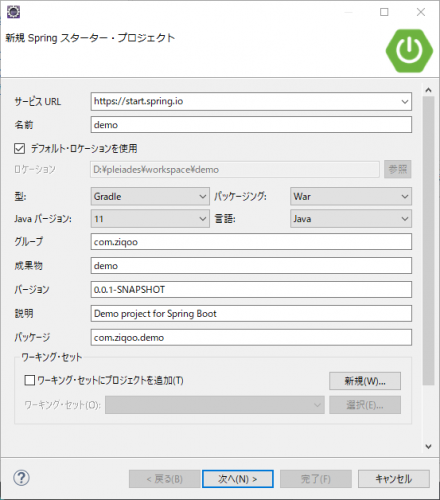
- 作成するプロジェクトは
DBはPostgreSQL、Spring Data JDBCを使用、
画面はThymeleafを使用、
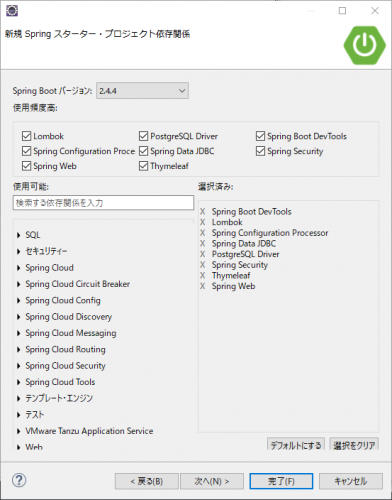
認証認可ありとする。 - 以下のように入力し「完了」
2. データーベースの設定
- /demo/src/main/resources/application.ymlを作成する。
- 接続先DBはここで作成したDBを使用する。
src/main/resources/application.yml
spring:
    datasource:
        type:
        driver-class-name: org.postgresql.Driver
        url: jdbc:postgresql://localhost:5432/postgres
        username: postgres
        password: example
3. 認証ユーザの設定
- とりあえずのSpring Securityの設定を行い、インメモリのユーザでログインできるようにしておく。
src/main/java/com/ziqoo/demo/WebSecurityConfig.java
package com.ziqoo.demo; import org.springframework.context.annotation.Configuration; import org.springframework.security.config.annotation.authentication.builders.AuthenticationManagerBuilder; import org.springframework.security.config.annotation.web.builders.HttpSecurity; import org.springframework.security.config.annotation.web.configuration.WebSecurityConfigurerAdapter; import org.springframework.security.crypto.bcrypt.BCryptPasswordEncoder; @Configuration public class WebSecurityConfig extends WebSecurityConfigurerAdapter { @Override public void configure(WebSecurity web) throws Exception { // セキュリティ対象外を指定 web.ignoring().antMatchers("/css/**", "/img/**", "/js/**"); }@Override protected void configure(AuthenticationManagerBuilder auth) throws Exception { auth.inMemoryAuthentication() .passwordEncoder(passwordEncoder()).withUser("user").password(new BCryptPasswordEncoder().encode("password")).roles("USER"); } @Override protected void configure(HttpSecurity http) throws Exception { http.authorizeRequests() .anyRequest().authenticated() .and() .formLogin() ; } /** * パスワードエンコーダー. * @return PasswordEncoder */ @Bean public PasswordEncoder passwordEncoder() { return new BCryptPasswordEncoder(); }}
4. 動作確認
- src/main/resources/static/index.html作成
- プロジェクトを実行
- ブラウザよりhttp://localhost:8080/へアクセス
- ログイン画面が表示されるので、user/password入力
- 先に作成したindex.htmlが表示されればOK